The E-Learning Curve Blog has moved!

You will be automatically redirected to the new address in 10 seconds. If that does not occur for some reason, visit
http://michaelhanley.ie/elearningcurve/
and update your bookmarks.

Showing posts with label content development. Show all posts

Friday, October 9, 2009

Open Source E-Learning Development 3: Open Office.org

Having discussed two key components of this Open Environment for E-learning; an XML-based authoring and content-generation tool, and an image-manipulation application, today I will discuss an XML-based productivity suite - a word processor, spreadsheet application, and presentation tool called OpenOffice.org.

In my view, tools like DocBook XML and XMLmind XML Editor are excellent primary content creation and generation applications; they provide imagecourseware developers with a familiar UI in which to create their content, while retaining the flexibility and interoperability of an XML-based structure.

One of the main benefits of using XML-based tools (as we will see in a future post) is that it facilitates a "create once, reuse many times" approach to content objects. By creating one appropriately-tagged XML-based master document, content can be refactored as a printable manual, an HTML-based guide, a PowerPoint-type presentation, and integrated into an e-learning content delivery platform, all based on one set of source XML-based information.

Now read on...

It is a truism that instructional designers, courseware developers and learning professionals (particularly in organizations) will source knowledge and learning materials from subject matter experts (SMEs) if possible. This research can be undertaken by using a range of strategies, including searching corporate knowledge-bases, interviewing SMEs, task-based collaboration, and so on.

While SMEs have the tacit and explicit knowledge, skills and domain expertise to inform your instructional design and content requirements, typically they have neither the time nor the inclination to learn a quite complex application like DocBook XML or XXE. However, we can say that the substantial majority of knowledge workers are competent in office productivity programs including word processors, spreadsheet, and presentation applications, such as those included in the Microsoft Office suite.

Sun’s OpenOffice.org is a collection of applications that provide the features expected from a modern office suite. These components are designed to reflect the functionality available in Microsoft Office.

According to their mission statement, the OpenOffice.org project aims

…to create, as a community, the leading international office suite that will run on all major platforms and provide access to all functionality and data through open-component based APIs and an XML-based file format.
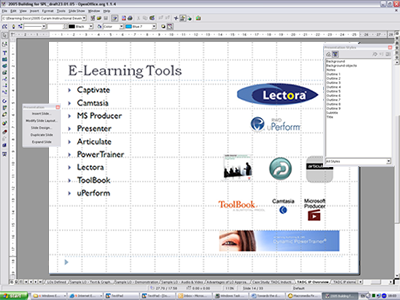
OpenOffice.org UI

Figure 1. PPT format presentation authored in OpenOffice.org

The primary benefit of OpenOffice.org for this open environment is the ability to author XML-based content to develop presentations that may be used in instructor-led classroom environments, as well as provide media developers with a PowerPoint-formatted file to facilitate insertion into the media authoring tool Microsoft Producer 2.

In my view, the real power of OpenOffice.org is that it enables courseware developers to take (for example) PowerPoint presentations developed by SMEs, modify this content, and output it in an XML-based format, allowing integration with the other tools we are discussing in this series.

In a sense, it is a "bridge": despite the much-vaunted interoperability of Microsoft XML Core Services (MSXML) in Office 2007, I would assert that there are still many issues associated with integrating MS Office-produced content into an open environment, and by extension problems using this suite if you need to integrate your content into another environment or platform.

__________

References:

OpenOffice.org version 3.x. [Internet] Available from: http://www.openoffice.org [Accessed 24 August 2009]

--

Tuesday, October 6, 2009

A Toolkit to Develop E-Learning in an Open (XML) Environment

Returning from content development theory, the gratis/libre debate, and the pros and cons of each approach, this post will focus on the range Opensource.svg of tools that you need to develop e-learning content in a (relatively) open environment.

Now read on…

The key to developing e-learning courseware in an open environment is to use a production model that liberates instructional design and content authoring from your final media outputs. In my view, this means taking an XML-based approach to your e-learning development environment. I would suggest that you need tools and components like the following tools to create an effective authoring and delivering system:

Content Creation Tools

  • DocBook
  • XMLmind XML Editor (XXE)
  • GNU Image Manipulation Program (GIMP)
  • XSLT transformations and XS-FOP formatting object processors


Media Creation and Integration: OSS Tools

  • Audacity
  • CineFX
  • Kompozer
  • OpenOffice.org
  • GNU Image Manipulation Program (GIMP)

Media Creation and Integration: Free-to-use Proprietary Tools
  • Microsoft Producer 2
  • Windows Media Developer’s Kit
  • Garageband
  • iMovie
  • Jing

Content Delivery Platform
  • Apache / MySQL / PHP
  • Moodle
  • Joomla
  • Drupal

Optional Proprietary Tools
  • Adobe Flash
  • Camtasia
  • Roxio Easy Media Creator or Toast

I'll be discussing developing a production model using this toolkit, starting tomorrow.
--

Monday, October 5, 2009

E-Learning, the Cathedral and the Bazaar: Courseware Development Approaches

...or Top-down versus Bottom-up approaches to content design.

In his 1997 essay The Cathedral and the Bazaar, open source evangelist Eric S. Raymond suggests that

the closed-source world cannot win an evolutionary arms race with open-source communities that can put orders of magnitude more skilled time into a problem.
Raymond considers the development of software by traditional methodologies as analogous to building a mediaeval cathedral,
carefully crafted by individual wizards or small bands of mages working in splendid isolation, with no beta to be released before its time.
He asserts that all software could be developed using the bazaar approach, which he described as
a great babbling bazaar of differing agendas and approaches... open to the point of promiscuity.

In this so-called Bazaar Model, roles are not clearly defined. Gregorio Robles suggests that software developed using the Bazaar model should exhibit the following patterns:

  • Users should be treated as co-developers
The users are treated like co-developers and so they should have access to the source code of the software. Furthermore users are encouraged to submit additions to the software, code fixes for the software, bug reports, documentation etc. Having more co-developers increases the rate at which the software evolves. Linus' Law states that, "Given enough eyeballs all bugs are shallow." This means that if many users view the source code they will eventually find all bugs and suggest how to fix them. Note that some users have advanced programming skills, and furthermore, each user's machine provides an additional testing environment. This new testing environment offers that ability to find and fix a new bug.
  • Early Releases
The first version of the software should be released as early as possible so as to increase one's chances of finding co-developers early.
Frequent Integration
New code should be integrated as often as possible so as to avoid the overhead of fixing a large number of bugs at the end of the project life cycle. Some open source projects have nightly builds where integration is done automatically on a daily basis.
  • Several Versions
There should be at least two versions of the software. There should be a buggier version with more features and a more stable version with fewer features. The buggy version (also called the development version) is for users who want the immediate use of the latest features, and are willing to accept the risk of using code that is not yet thoroughly tested. The users can then act as co-developers, reporting bugs and providing bug fixes. The stable version offers the users fewer bugs and fewer features.
  • High Modularization
The general structure of the software should be modular allowing for parallel development.
  • Dynamic decision making structure

There is a need for a decision making structure, whether formal or informal, that makes strategic decisions depending on changing user requirements and other factors (i.e. in extreme programming).

In Raymond's view, most well-known OSS products including Linux, Apache, and the GNU Compiler Collection align with the Bazaar model.
In the 'traditional' Cathedral model (advocated in Fredrick P. Brooks, Jr. in The Mythical Man-Month), development takes place in a centralized fashion. Clearly defined roles including experts dedicated to designing (the architects), established management styles, and 'craftsmen' (developers) responsible for implementation all contribute build a pre-established design according to a pre-agreed blueprint.


He goes further to say that in order to preserve the architectural integrity of a system, its design should be done by as few architects as possible.

Interestingly, the Bazaar model comes close (in manifestation, if not in philosophy) to what Brooks in the 1995 Anniversary edition of his text describes as "shrink-wrapped software." Brooks suggests:

For the developer in the shrink-wrapped industry, the economics are entirely different from those of the classical industry... the starkly different economies have given rise to starkly different programming cultures.

(p.284)


Rather than the traditional Cathedral model,
The shrink-wrapped industry... [is] freewheeling and fiercely focused on getting the job done rather than on process. in this climate, there has always been a much greater recognition of the talent of the individual programmer, an implicit awareness that great designs come from great designers [my italics]. The start-up culture has the capability of rewarding star performers in proportion to their contributions... [i]t is not surprising that many of the stars of the new generation have gravitated to the shrink-wrapped industry.

(p.284)


More tomorrow as I discuss towards the implications of these two models for the e-learning industry.

___________
References:

Brooks, R.P. (1995). The Mythical Man-Month Anniversary Edition London, Addison Wesley Longman, Inc.


Raymond, E. S. (2000). The Cathedral and the Bazaar Version 3, Revision 1.57 [Internet] Available from: http://www.catb.org/~esr/writings/
cathedral-bazaar/cathedral-bazaar/
[Accessed 22nd August 2009]

Robles, G. (2004) A Software Engineering approach to Libre Software, IN: Robert A. Gehring, Bernd Lutterbeck: Open Source Jahrbuch 2004, Berlin: Lehmanns Media. [Internet] Available from: http://www.opensourcejahrbuch.de/download/
jb2004/chapter_03/III-3-Robles.pdf
[Accessed 21st April 2008]
--

Tuesday, September 15, 2009

Moodle LMS: Hot Potatoes is Now Free!

I blogged recently about the development of the Nanogong and the Riffly audio-visual plugins for Moodle 2.0. Today, I'm pleased to announce that an old - that is, well-established -Moodle plugin is now freely available.

Now read on…

I first encountered the Hot Potatoes question-test (Q-T) and exercise generation suite back in 2006 as an MSc student in Dublin. As a commercially-available utility, it offered well-rounded enhancements to the fairly basic Q-T capabilities of the Moodle platform. As of version 6.2, Hot Potatoes is now free to use.

According to the developers Half-Baked Software Inc.

The purpose of the Hot Potatoes is to enable you to create interactive Web-based imageteaching exercises which can be delivered to any Internet-connected computer equipped with a browser. The exercises use HTML and JavaScript to implement their interactivity, but you do NOT need to know anything about these languages in order to use the programs. All you need to do is enter the data for your exercises (questions, answers, responses etc.), and press a button. The program will create the Web pages for you, and you can then upload them to your server.

There are five basic programs in the Hot Potatoes suite:

  1. JQuiz creates question-based quizzes.
    Questions can be of four different types, including multiple-choice and short-answer. Specific feedback can be provided both for right answers and predicted wrong answers or distractors. In short-answer questions, the learner's guess is intelligently parsed and helpful feedback to show what part of a guess is right and what part is wrong. The learner can ask for a hint in the form of a "free letter" from the answer.
  2. JCloze creates gap-fill exercises.
    Unlimited correct answers can be specified for each gap, and the learner can ask for a hint and see a letter of the correct answer. A specific clue can also be included for each gap. Automatic scoring is also included. The program allows gapping of selected words, or the automatic gapping of every nth word in a text.
  3. JCross creates word jumble / crossword puzzles which can be completed online.
    You can use a grid of virtually any size. As in JQuiz and JCloze, a hint button allows the learner to request a free letter if help is needed.
  4. JMix creates jumbled-sentence exercises.
    You can specify as many different correct answers as you want, based on the words and punctuation in the base sentence, and a hint button prompts the learner with the next correct word or segment of the sentence if needed.
  5. JMatch creates matching or ordering exercises.
    A list of fixed items appears on the left (these can be pictures or text), with jumbled items on the right. This can be used for matching vocabulary to pictures or translations, or for ordering sentences to form a sequence or a conversation.

These tools are complemented by a program called the Masher, which facilitates the creation of complete units of material (such as multiple-question quizzes) in one simple operation. The utility supports a range of question types including:

  • True/False
  • Short Answer
  • Multiple Choice
  • Cloze Test
  • Word Jumble / Crossword
  • Drag and Drop
  • Mix and Match

Hot Potatoes allows you to add:

  • Text
  • Images
  • Audio
  • Video
  • Question Timer
  • Web plug-in objects like Flash Player

to your web server or LCMS-deployed question tests. The tool also adds interoperability in the shape of SCORM 1.2.

Hot Potatoes is available for Windows (except 95), for Linux running Wine version 6.3 and for Mac OS X.

Click here to find out more about Hot Potatoes (external link to developer's site). .

--

Monday, September 14, 2009

Podcasting for E-Learning: Recording Audio

You've prepared your script, warmed up your voice-over artist, set up your mic, and launched Audacity. Now you can record your narration.

Typically, audio narration is recorded longform – that is, you record a large segment – maybe 10 minutes or so in one take. If you make an error, or mispronounce a word, I recommend that you simply go back to the start of the sentence or phrase and start again. There is no need to stop recording. Make an audio note for yourself by saying something like “I’m going to take that again” before repeating the phrase to be redone and carrying on with the narration.

It's as well to point out now that everyone fluffs their lines: get used to it. Only the very best professional voice-over artists will get everything right in one long take, and even they will never get it right first time, every time. In my view, your audio content will benefit from the narrator getting the four 'P's' (pace, pitch, projection, and pausing) right, than attempting to record a piece in one go.

Once your recording is complete, save the file. This file is called the source or master file. I usually append this file with the term “_master” as in myAudio_master.wav.

Now, import your master file into your editor and re-save your file as myAudio_edit.wav. This version of the file is the working version, where you will apply digital signal processes and make your edits.

First of all, the file is normalized (see Figure 1). Normalization is the process of increasing (or decreasing) the amplitude (often erroneously called "volume") of an entire audio signal so that the peak amplitude matches a desired target. Typically, normalization increases the amplitude of the audio waveform to the maximum level that does not introduce any new distortion.

audacity_normalize

Figure 1. Normalization dialog box with process optimized for speech (-10dB)
[Click to enlarge]

In the normalization process, a constant amount of gain (increase in audio signal amplitude) is applied to the selected region of the recording to bring the highest peak to a target level, usually 98% (-0.3 dB) of the maximum 0dB. Normalization differs from dynamics compression, which applies varying levels of gain over a recording to fit the level within a minimum and maximum range. Normalization applies the same amount of gain across the selected region of the recording so that the relative dynamics (and signal to noise ratio) are preserved.

The normalization process usually requires two passes through the audio clip: the first pass determines the highest peak, and the second pass applies the gain to the entire recording.

Next, Noise Reduction is applied (see Figure 2). Noise reduction (NR) is the process of removing unwanted noise from an audio signal. All recording devices, both analog or digital, have traits which make them susceptible to noise. Noise types include ambient noise, which is generated in the recording environment (for example, active air conditioning), or noise can be random (white noise), or coherent noise (introduced by the recording device electronic or mechanical components).

audacity_NR

Figure 2. NR dialog box
[Click to enlarge]

In electronic recording devices, a major form of noise is hiss, which is caused by random electrons that, heavily influenced by heat, stray from their designated path. These stray electrons influence the voltage of the output signal creating detectable noise. Laptop-based recording is particularly susceptible to this form of noise, due to the close proximity of heat sources like the CPU and heat sink to the machine's soundcard.

In the analog world magnetic tape noise is introduced because of the grain structure of the tape medium itself, as well as by crossover noise from moving parts in tape motors.

Finally, the audio is equalized (see Figure 3). Equalization (EQ) is the process of using digital algorithms or electronic elements to alter the frequency response characteristics of a sound signal.

audacity_EQ

Figure 3. Full-range Graphic Equalizer
[Click to enlarge]

At its most basic level, many consumer sound playback devices have a 'Bass' and 'Treble' tone controls to enhance the top- and bottom-end frequencies of a recording. Digital audio editors have much more sophisticated equalizing capabilities.

Once you have undertaken these pre-editing processes, save your working (or edit) file.

More...

--

Wednesday, September 9, 2009

Podcasting for E-Learning: Recording with Audacity

Having given you the ha'penny (or dime) tour of Audacity, it's time to talk about recording audio with a digital editor. Figure 1 describes the end-to-end audio production process. Today, I will look at steps 1 through 5:

Podcast_Production_Process

Figure 1. Audio Production Process
[Click to enlarge]

And these are the steps in detail:

Activity

Requirement

Audio source

A Narrator

Capture

A Microphone

Encoding

Audio editing software

Once you have your narration script, your mic, and your audio-enabled computer you may begin recording.

You Try:

  1. Launch Audacity

  2. In default configuration, a new, empty project will open. Save this project to a location of your choice. Call it MyPodcast (or whatever name you choose). This saved project becomes the "holder" for all of your recorded and imported sound clips.

    audacity_save_proj
    Remember, that if you don't save your project before you start recording, all recordings, edits and other files will be written to the default directory set on the Directories tab of the Preferences dialog box.

  3. Check the Preferences

    Confirm that your desired playback and recording device are set. If you're going to record a mono signal, set the number of recording channels to 1 (Mono) on the Audio I/O preferences dialog box.

    When picking a device to record from, make sure you've set up all the connections correctly, including plugging a microphone in to the computer microphone input. Since most soundcards mix the inputs back in to the outputs, the easiest way to test your microphone is to speak in to it while playing with your sound card mixer. The sound card mixer is a piece of software either provided by the sound card maker, or by the operating system you're using.

    The Windows mixer is quite straight-forward, though some soundcards use their own custom mixing panel. The Mac's mixer is controlled via the Sound Control Panel, and Linux users can choose from a variety of mixer applications. Set the signal input to the desired level. I recommend setting the volume to about 80 per cent of maximum. This ensures you have enough ‘headroom’ to capture variations in tone and amplitude without distorting the signal from the microphone.

  4. Begin recording

    audacity_menu2 - The red Record button initiates recording.

    - The blue Pause button pauses the recording. Click on the button again to continue recording.

    - The yellow Stop button finishes the recording process for the clip you're capturing.

    Well done: you have made your first audio recording in Audacity! You can now manipulate your recording and explore the editing capabilities of Audacity.

    More…

    --

Tuesday, September 8, 2009

Podcasting for E-Learning: Setting Audacity Preferences

Setting Audacity Preferences on Your Computer

Before beginning a recording project in Audacity, it's necessary to configure your version of Audacity’s preferences in the Edit Preferences dialog box. This ensures that the sound source and playback options are set correctly as well as bit-rate, quality indicators and so on. Follow this step-by-step procedure to configure Audacity for your computer and operating system.

Configuring Audacity

You Try

  1. Launch Audacity
  2. Check the Preferences.
    Checking the Audacity preferences is very important step and should be done before you begin editing any audio. You can locate the Preferences Dialog box by going to Edit Preferences, or the shortcut key combination CTRL+P.
  3. Set Audio Input & Outputs.
    Select the Audio I/O tab from the choices across the top of the Preferences Dialog box. I/O is short for Input Output and is where you’ll tell it to record your sound from and where to play it back.
  4. Set Playback Output.

    Audacty_Pref_pb
    From the Playback Device: drop-down menu, select the output device that you would like to route the sound through. In this case, I’m sending the signal via my internal PC sound card.
  5. Set Recording Input.

    Audacty_Pref_IO

    From the Recording Device drop-down list, select the sound source you want to record from. In this case, I’m selecting the SigmaTel sound card, which takes input from the microphone that I’m going to use to record some voiceover narration.

    audacity_pref_chk
    If you’re recording music, select the Record in Stereo check box. If you’re just recording voice-over narration, leave it unchecked. Similarly, uncheck the "Play other tracks while recording new one” option (unless you’re Les Paul or Mary Ford).
  6. Sound Quality Tab.

    audacity_prefs_qual
    The Quality tab is where you’ll set the quality of your audio. The higher the sample rate, the better quality your audio, but the larger the file size will be. For CD quality sound, record at 44,100 Hz. You’ll typically leave the other settings at their factory defaults.

More…

Friday, September 4, 2009

Podcasting for E-Learning – Tour of Audacity’s User Interface

In my previous post, I discussed interface metaphors, and showed a video example of the process behind the analog tape-editing metaphor used by most media editing tools - including Audacity. Today, I will describe how this approach to editing is replicated virtually, via your computer's user interface. Figure 1 shows the primary menu options and functions of Audacity.

audacity_UI

Figure 1 The Audacity UI
[Click to Enlarge]

The menu bar contains all of the functions for Audacity.

audacity_menu Figure 2 The Audacity Menu bar
[Click to Enlarge]

You’ll see some familiar features – Open, Import, Copy, Cut, Paste, and so on. There are also a range of audio-specific functions including the facility to analyze the audio signal, generate white noise, a pure note tone, or a click track, as well as a range of audio effects including:

  • Noise reduction (NR) to remove background noise
  • Normalization (increasing or decreasing the amplitude of an entire audio signal so that the peak amplitude matches a desired target. Typically, normalization increases the amplitude of the audio waveform to the maximum level that does not introduce any new distortion – this “makes the audio louder”
  • Equalization (EQ) - changing the characteristics of the audio – i.e. add bass or treble, cut or enhance certain frequencies

The features of the Audacity timeline (see Figure 3) are common across all audio editors.

audacity_timeline

Figure 3 The Audacity Timeline
[Click to enlarge]

  1. The label track enables you to insert information about events on the timeline. Here, I have indicated the point where the intro music begins, and the point where the first voice-over should start.
  2. Most important is the audio waveform itself. The waveform is a graph showing the amplitude (loudness) of the audio signal over time.
  3. The track controls allow you to control the characteristics of an individual track on the timeline.

There are two types of audio file in Figure 3: a stereo file which is typically used for music, and a mono file, which we use for narration. There is little point recording voice-overs in stereo – you only have one voice (or audio source), after all. If you record a voice-over in stereo, you only double the file size, for no gain in quality.

Using Audacity

These are the Rules of Audacity (according to SourceForge.net)

  • One audio clip per track.
    An audio clip is simply a piece of audio material, imported, recorded, split or duplicated from another track, one track can only carry one piece of audio at a time. You can extend it by pasting material or inserting silence in to it, or cut a piece away, but it will always be one continuous piece of audio.
  • Audacity always records to a new track.
    This new track is opened at the lowest free track. You'll can zoom out and then resize the track view of the lowermost-most track to see what is recorded. You can actually use the window sliders at the bottom and right to do this after starting to record, but this way no performance will be lost to the windowing system.
    Pressing CTRL+F displays all the tracks in your entire project. Note: this function only affects the horizontal zoom (left-right zoom); you must use the mouse and the magnifying glass icon to zoom out .
  • Edit/Duplicate will not create a new audio file.
    This may not seem important, but it is useful to know this if you're editing a large recording. Audacity is a non-destructive editor (unlike the analog editing process): it works by referencing the original (or master) audio material: edits and other change you make affect the referenced file, not your master file.

    One of the positive consequences of non-destructive editing is that you can undo/redo edits as many times as you need to even after you have saved your project, which is pretty cool.

Next Time: Setting Audacity Preferences

--

Thursday, September 3, 2009

Podcasting for E-Learning: Audio Editing + Audacity

Previously in this series of E-Learning Curve Blog posts about Podcasting for E-Learning, I discussed downloading and installing the open source audio editor called Audacity. I chose Audacity because it’s free (as in speech), it’s available for Linux/Unix, Mac OS and various Windows operating systems, and most importantly, it’s a very impressive media editing tool.

If you’ve taken the time to install and run the app you should see something similar to Figure 1: this is the Audacity audio editor user interface (UI) in Windows XP.

image Figure 1. The Audacity User Interface
[Click to enlarge]

If you’re not familiar with digital media production, this type of UI can seem quite daunting, and even alien. Today, I’m going to begin normalizing this new environment for you.

Now read on…

I’ll begin by taking a step back for a moment: let’s discuss interface metaphors.

An interface metaphor is a set of unifying concepts used by a computer graphical user interface to help users more easily interact with the computer. The interface metaphor treats the monitor of a computer as if it is the user's desktop, upon which objects such as documents and folders of documents can be placed. A document can be opened into a window, which represents a paper copy of the document placed on the desktop. Since it was first developed at Xerox PARC in 1970, the desktop metaphor has been extended and stretched, so that items not found on a 'real' desktop (like a trash can) are now displayed onscreen.

In this context, we can say that pretty much all digital editors have an interface metaphor based on analog tape editing procedures: the waveform (see Figure 2) represents the magnetic tape, and the transport bar (Play, Pause, Stop buttons, and so on) represents an analog tape recorder's transport controls, for example. Similarly, there are Cut, Splice and digital sound effect features and functionality that replicate these processes in the analog world.

audacity_waveform

Figure 2. Some Audacity features and functions
[Click to enlarge]

In my view, the most effective way to demonstrate these concepts is through an example. In this YouTube video, Rod Summers demonstrates how to edit a piece of analog magnetic tape.

The Scenario:

The source audio is a short piece of recorded voice-over of the presenter counting from one through ten. He has transposed "six" and "five" in his narration. This demonstration outlines the process for correcting the error.

Here are the steps in the process:

  1. The editor cues up the tape by using a technique called "scrubbing"
  2. He marks the In- and Out points for the edit...
  3. And he marks the insertion point for the edit
  4. Next, he makes the edit by physically cutting the tape and splicing the join...
  5. Before inserting the cut piece of tape into it's new position
  6. Finally, the edited tape is played back to test the verify the edit


Next time: I will look at editing in a digital environment ...and don't worry, this is a much easier undertaking when using a tool like Audacity!

--

Tuesday, September 1, 2009

Podcasting for E-Learning: Editing and Producing Podcasts

So far in this series of posts about Podcasting for E-Learning from the E-Learning Curve Blog, I've covered a lot of material, including:

Now, it's time to look in some depth at editing and producing podcast content.

As I discussed last time, non-linear editing applications are media editing tools which can randomly access the source material - and that’s it. You don’t have to edit audio in a beginning-middle-end sequence. You can also drop in new files, split audio, modify the volume (or amplitude), “top and tail” the recording, and add effects, before generating a rendered file which contains all of the modifications you made to your audio.

Non-linear editing enables the editor to access any frame in an audio clip. It can be viewed as the audio equivalent of word processing, which is why the process is often called desktop editing. Typically, audio is either recorded directly to a PC hard drive, or is imported from another source, in the same way as that text is either authored within the a word processor application, or a file is imported from another location.

In non-linear editing, the original source files are not lost or modified during editing. This means that you can easily make changes and cuts, experiment with the audio, and undo previous decisions secure in the knowledge that you are not interfering with the original - or master - files. Loss of quality is also avoided as you don't have to repeatedly re-encode the audio when different effects are applied. Audacity-logo-r_50pct

While there are many excellent commercial, free-to-use, and open source audio editing applications applications available, the editor I will talk about during this series is called Audacity.

Audacity is an open source, easy-to-use multi-track audio editor and recorder for Windows, Mac OS X, GNU/Linux and other operating systems. You can use Audacity to:

  • Record live audio.
  • Convert tapes and records into digital recordings or CDs.
  • Edit Ogg Vorbis, MP3, WAV or AIFF sound files.
  • Cut, copy, splice or mix sounds together.
  • Change the speed or pitch of a recording.

So, let's download and install Audacity.

You Try:

  1. Navigate to the Audacity download page and select the download for your operating system.

    audacity_download
  2. Click on the appropriate link. This will take you to the SourceForge download page - don't "save link as.." or "save target as..".
  3. The SourceForge download should start automatically. If it does not, click the links in the black panel marked "direct link" or "mirror". Only these links and the automatic download are authorized versions of Audacity. Disable any automatic download managers if the download is incorrect.

I also recommend that you download these optional files:

  • LADSPA plugins 0.4.15 installer (.exe file, 1.5 MB) – nearly 100 audio digital effects plug-ins
  • LAME MP3 encoder - Allows Audacity to export MP3 files

System Requirements: Windows-based Systems

The values in the "Recommended RAM/processor speed" column below are for tasks like recording for an hour, or editing three 20 minute tracks simultaneously. The values in the "Minimum RAM/processor speed" column will be fine for smaller/shorter tasks, especially if unused programs are closed.

Windows version

Recommended RAM/processor speed

Minimum RAM/processor speed

Windows 98, ME

128 MB / 500 MHz

64 MB / 300 MHz

Windows 2000, XP

512 MB/1 GHz

128 MB/300 MHz

Windows Vista Home Basic

2 GB / 1 GHz

512 MB / 1 GHz

Windows Vista Home Premium/Business/Ultimate

4 GB / 2 GHz

1 GB / 1 GHz

Audacity works best on computers meeting more than the minimum requirements in the table above. Where Audacity is to be used for lengthy multi-track projects, Audacity's developers recommend using Windows 2000, XP or Vista running on machines of substantially higher specification than the minimum specs outlined above.

Apple Macintosh

Installation instructions (MacOS 9 and OS X):

  1. Inside your Applications folder, create a folder called "Audacity"
  2. Double-click the downloaded .dmg to mount it
  3. Option-drag the whole of the .dmg contents (not the .dmg itself) into the "Audacity" folder you created
  4. Double-click Audacity.app inside the Applications folder to launch it

Mac OS X version

Audacity Version

Recommended RAM/processor speed

Mac OS X 10.1

Audacity 1.2

64 MB / 300 MHz

Mac OS 9.0

Audacity 1.0

64 MB / 300 MHz


Linux/Unix

Audacity's developers recommend using the latest version of Linux/Unix from your distribution that is compatible with your hardware specifications. Audacity will run best with at least 64 MB RAM and a 300 MHz processor.

Installation packages for Audacity on GNU/Linux and other Unix-like systems are often provided by individual distributions:

  • Alt Linux
  • Debian
  • Fedora Core
  • Fedora Project
  • Mandriva i586
  • OpenSUSE
  • Red Hat
  • SuSE and packman (suse)
  • Ubuntu: packages.ubuntu and rpm.seek

This list is not comprehensive. If you don't see an up-to-date package for your distribution, search your distribution's web site for the latest information. Alternatively, you can compile Audacity from source code.

More…

New E-Learning Curve’s Other Podcast new episode release:

Transatlantic: The Flying Boats of Foynes. The Complete Podcast Documentary. 314_podcastcover1

It's the 70th anniversary of the first scheduled trans-Atlantic air passenger service, which opened in July 1939. Told against a backdrop of the momentous events of World War II, this podcast documentary tells the story of the town of Foynes on the River Shannon in Ireland, which served as the western European base for the majestic flying boats of Pan Am, Imperial Airways and other airlines in the Golden Age of Aviation.

From their proving flights in the late 1930's through World War II and into the post-war period, Chief of Launch Operations at Foynes recalls his time working for Imperial Airways, and the effect of this glamorous mode of travel on a small Irish port. Even today, airplanes like the Catalina, the Short Empire class, and the majestic Boeing B-314 Clippers speak of a time now long gone.

Click on the link to celebrate the memory of the age, and the life and times of those who lived it.

Click here to listen to the podcast (MP3, 28MB).

Click here to listen to the podcast on iTunes.

Click here to view the transcript of this podcast (PDF, 585K).

--

Monday, August 24, 2009

Podcasting for E-Learning: Benefits of Digital Audio

The first principle of digital audio is:

Digital audio is the study of discrete values.

This characteristic is very important: it allows us to manage audio information very efficiently. Using digital techniques, the capability to process information is greatly enhanced.

In a previous post, I discussed a little about the basics of digital audio. Today, I want to talk about how digital audio technology benefits podcasters. What are its advantages over an analog system of recording?

Here are a few specifics:

  1. Less noise than an analog recording system.
    In an analog recording system, magnetic particles are oriented by the tape head in a manner that is analogous with the audio signal that is driving the tape head. The tape itself has billions of little magnets on it, and it is physically impossible to orient every single one correctly. These remaining magnetic particles are randomly oriented, which shows up on playback as what is called tape hiss. With a high enough sample rate and resolution, digital audio produces recordings that have significantly less noise than analog.

    The noise in an analog recording system is usually expressed as a "signal to noise ratio". The signal to noise ratio tells you how much more signal there is on the tape recorder outputs compared to the noise in a audio signal. For example, a digital audio system using a resolution of 16 bits will often yield a signal to noise ratio of more than -90dB (in EMG’s in-house studio the noise threshold is, for example) for decibel, a unit of measurement in the audio world. -90dB means that the noise floor is 90dB below the signal level.

    It would take a very high-end and expensive analog recording system to produce even a signal to noise ratio of -60db. This difference of 30dB is dramatic: the noise floor in the analog recording system will be 1000 times louder than the noise floor in a digital system. The reason for this is quite simple: a digital recording system records only the binary numbers, not analog signals which accumulate noise from the imperfect recording process. Since a digital system only records numbers (zeroes and ones, or bits, to be specific), as long as the bits can be recorded and read by the digital tape or digital disk system, then the only thing that matters is the theoretical 6dB per bit of dynamic range that is determined by the resolution of the digital recording system.
  2. Ability to make copies without signal loss.
    Another advantage of digital audio over analog is the ability to make as many copies of the original as you want without degrading the signal quality. Every time you duplicate an analog recording, you lose audio quality and add even more noise. Remember that digital audio is just a group of digital samples, made up of zeros and ones that represent the audio.

    These numbers can be "copied" to another device or medium in a way that ensures that the result is the same as the original. This means that the copy is a "clone" of the original and sounds the same. This is true for the first copy or the seventy-first. Each time you copy an analog recording, you introduce between 3 and 6dB of noise, which further reduces the signal to noise ratio. Clearly, for pristine back-up want to use multiple copies of material during production, digital has the advantage.
  3. Better audio quality for a lower cost.
    Digital audio used to be much more expensive than analog. This was because the early digital tape recorders used expensive and precise reel-to-reel mechanisms and early digital technology which was inherently more expensive. As recently as five years ago, the cheapest digital multi-track on the market was over $10,000 - analog reel-to-reel machines could be had for a fraction of that price. Now, digital technology has advanced to the point that this is no longer true.

    This is much in part to the advancements made in digital technology due to computers as well as cost reduction of other technologies important to digital recording like video cassette mechanisms and hard disk drives. Since digital audio technology uses similar components as the computer and multimedia industries, digital audio devices can take advantage of the lower cost of components due to their high manufacturing volumes. The result? Today's digital audio multi-tracks not only out-perform analog machines, costs less to manufacture, and is quite easily integrated into a multimedia production environment.

More...

New E-Learning Curve’s Other Podcast episode release:

Part 7 of Transatlantic: The Flying Boats of Foynes

In Part 7: End of an Era

314_podcastcover8_300

The War in Europe ended on May 25th, 1945. As normal life re-established itself, times also began to change for Foynes. Larger and more powerful airplanes had been built and operated successfully. A new land-based airport was established at the far side of the river. It was called Shannon International.

In this final episode of Transatlantic: The Flying Boats of Foynes, Chief Operator of Launch Operations Frank Buckley describes the end of the flying boat service in Foynes, Ireland, and the emergence of Shannon airport as the new home for transatlantic aircraft in the Post-War years.

Click here to listen to the podcast (MP3, 8.5MB).

Click here to view the transcript of this podcast (PDF, 24K).

Even though this is an e-learning blog, the observant among you will notice that the podcast isn’t about e-learning. That’s OK – the point of e-learning is to provide training professionals with a means of creating and distributing content that enables people to acquire information, knowledge, skills, and expertise on a diverse range of subjects: as e-learning practitioners, it’s our job to facilitate this process.

Tuesday, August 18, 2009

Podcasting for E-Learning: Critically Analyzing Podcasts

My previous blog posts on podcasting have focused the human side of podcasting: narration, story-telling, communicating with your audience. I've looked at what you say, and how you say it, dipping liberally into the eighty or so years of accumulated skills and knowledge from radio broadcasting to reinforce my arguments - after all, content is king, and radio is still the place where people talk.

Now, it's time to spend a little time understanding the technical aspects of podcasting. Don't worry if you've never so much as looked at a sound file before. Recording and producing your own content is great fun, and I hope you'll find that there's tremendous satisfaction to be had creating and crafting your own little corner of the internet.

As you begin to hone your podcasting skills, you'll find that you're also taking a remarkable learning journey. It's one that I think will enhance the way to sense and think about the medium of sound. If you are a musician, you'll already know what I mean. Those of you who can play (even if it's only a few chords on the guitar) know that you listen to music in a qualitatively different way to those don't play. The very act of learning an instrument teaches you to become an active listener and a critical analyst of sound. How is that musical piece orchestrated? How are the harmonies arranged, what technique is that soloist using? What melodic elements hold your attention? As well as just enjoying a musical number on its own merits, you can apply a critical ear to the music, and I would suggest appreciate a work in a much more profound way than the casual listener. The same principles apply when you begin to podcast.

Jack Herrington (2005) agrees with this interpretation. In his text Podcasting hacks: tips & tools for blogging out loud, he considers that there are four elements you should critically examine:

Podcast Structure: Analyze content for recurring or format elements used to keep the listener engaged with the podcast, and to motivate the listener to return for future elements. Is the "interesting stuff" (p.51) at the beginning, the middle, the conclusion, or distributed throughout the pod cast presentation.

Technical Elements: Podcast should take advantage of appropriate Web 2.0 and multimedia components to be effective. In some instances, this can mean a voice-over narrating a story very simply. In other contexts, a podcast may take advantage of music, wildtrack, multiple voices, and sound effects.

Content: Try to understand what holds your attention. This is especially vital: according to Herrington, it's what "primarily keeps people coming back" to listen again. The author suggests that

"When something moves you, listen to it over and over to figure out what is keeping you engaged."

(p.52)

Next time: Fundamentals of Digital Audio Editing

New E-Learning Curve’s Other Podcast episode release:

In Part 6: The Flying Boats at War 314_podcastcover6_300

During World War II, the civilian airlines of the Allies continued to fly, though perhaps the nature of the passengers had changed. As the US, Britain, and their allies prepared for the invasion of Europe,

In this episode, Chief Operator of Launch Operations Frank Buckley describes working on the flying boats during the War, the hazards that the aircraft encountered, searching for the German battleship Bismarck, and the excitement of the night-time take-offs and landings.

Click here to listen to the podcast (MP3, 11MB).

Click here to view the transcript of this podcast (PDF, 24K).

Even though this is an e-learning blog, the observant among you will notice that the podcast isn’t about e-learning. That’s OK – the point of e-learning is to provide training professionals with a means of creating and distributing content that enables people to acquire information, knowledge, skills, and expertise on a diverse range of subjects: as e-learning practitioners, it’s our job to facilitate this process.

___________

References:

Herrington, J. D. (2005). Podcasting hacks: tips & tools for blogging out loud. O'Reilly Media, Inc.

--

Thursday, August 13, 2009

Podcasting for E-Learning: Digital Audio Basics

Really exceptional podcasts transmit a sense of "being there."

Well-designed, planned, narrated and produced audio content has the facility to engage the audience and transport the listener, providing the right cognitive environment for learning or entertainment or whatever goal the podcast seeks to achieve. As the old story goes, “there are better pictures on the radio.” Denis Nowlan, Deputy to the Controller for BBC Radio 4 describes this as

the wonder of radio [and sound] …the conjuring of magical sounds, Prospero-like, out of the silently teeming air. And the sense of joining, instantly, with a vast community of listeners.

(2005)

Of course, this cognitively experienced sense of “being there” is a completely artificial construct, none more so when you consider audio podcasting. The journey the podcaster takes us on is based on nothing in nature; that is, a narrative transmitted as binary data: electronically-mediated zeros and ones.

I will discuss this phenomenon in detail next time, but for now, read on…

Digital audio is actually very similar in concept to motion film, where a rapid series of still photographs make up a “motion picture.” Digital recording reproduces audio signals by taking many still “pictures” – or samples - of an audio waveform and then reconstructing the waveform for playback digitally (see Figure 1).

audio sampling

Figure 1. Digital Sampling of Audio Waveform
[Click to Enlarge]

In film, the number of still images (frames) we move through the projector per second improves the smoothness and quality of picture we see. Similarly, the size of the film's light-sensitive crystals in each frame determines the visual resolution of the image - and we all know movies look better in 70mm as opposed to the 35mm or 16mm film.

In digital audio, an analog signal is typically sampled 44,100 times a second. Each sample is created by taking a "snapshot" of the amplitude (or strength) of an analog audio signal at a particular moment in time. and converting that amplitude into a binary number.

The number of samples contained in each second of audio is called the sample rate. The greater the number of samples per second, the greater the resolution of the audio signal.

Let’s return to the film analogy: the faster the film rate through the camera, the better the ability of the film to pick up motion. For example, if you crank a film camera too slowly, then motion past a camera is not smooth since the frame rate does not capture enough frames in a given amount of time to stop the motion from appearing to jump or jerk - too much action happens in front of the camera "between frames" for the motion to appear natural.

Time for an example: The resolution of an audio CD is 16 bits and cd the sample rate is 44.1KHz. This means that the audio is sampled 44,100 times a second and a series of 16 zeros and ones is used to define the amplitude of the waveform at each of those 44,100 points.

This resolution – commonly called “CD Quality” and should be your baseline for recording a podcast. When recording voice-over narration, capture all of your audio at 16 bit, 44.1KHz, in mono using the WAV format in Windows, Au format for Unix-based systems (like Linux), and AIFF for Apple Mac.

More...

__________

References:

Nowlan, D. (2005). Radio: where the pictures are better: Denis Nowlan speaks for the medium which leads you by the ear. [Internet] Available from: http://findarticles.com/p/articles/mi_m0KZH/is_1_19/ai_n15928065/ Accessed 12 August 2009.

--

Tuesday, August 11, 2009

Podcasting for E-Learning: Introduction to Audio Production

Having outlined the conceptual terrain of podcasting, it's time to look at the nuts and bolts of podcast production. In this part of the series, I won't delve too deeply into script-writing: I'll return to that subject in a later series of blog posts, but if you have a look at my series of articles on instructional design to understand my orientation on theoretical and pedagogical approaches to this activity.

Today, I'm going to talk about digital audio, and the basic hardware and software you'll need to begin creating your own podcasts. As I indicated yesterday, the principles of multimedia have been understood for over 80 years, but wide usage of digitally factored technology did not begin in earnest until the 1970’s, because theory had to wait for hardware and software to catch up.

Until recently, recording audio cost many thousands of dollars, used specialized and sophisticated equipment, took up lots of space (in the form of a dedicated recording studio), and required years of specialized training, followed by years acquiring hard-earned OTJ experience to make even the most basic recordings.

In the last five years however, the price of recording audio has gone down, while the quality of consumer recording devices has increased exponentially. Now, it’s even possible to create and deliver reasonable quality audio via your cell phone with a Edge connection to the internet. But we’re not going to do that today. Today, I will describe the essential hardware and software you’ll need to begin recording and producing good quality audio for integration for podcasting and e-learning.

You will need…

Activity

Requirement

Audio source

A Narrator

Capture

A Microphone

Encoding

Audio editing software

Recording Medium

Audio Tape (i.e. DAT)

or

PC Hard Drive

Playback

Playback Device

  • PC
  • Laptop
  • PDA
  • Cell Phone
  • Portable Media Player

Speakers

Headphones

And this is the audio production process (see Figure 1).

Podcast_Production_Process

Figure 1. The Audio Production Process
[Click to Enlarge, 145k]

Production Step

Component

Process Description

Audio Source

Voice–over narrator

Reads script based on objectives of learning initiative

Recording Device

Microphone

Captures analog sound waves and coverts to electronic signal

Conversion

PC soundcard

Turns electronic signal into a series of digital bits

Encoding

Audio Editing Software

Software saves the audio as a sound file (i.e. WAV)

Editing

Audio Editing Software

The audio file is edited, & enhanced. It is rendered in a playback-friendly format like MP3

Distribution

LAN, internet, CD, DVD, memory card

Content is published for distribution via the Web as an audio only file (i.e. podcast), in a format like Flash, or for delivery via CD/DVD, memory stick

Playback

Soundcard, Speakers, Headphones

Media is reproduced via software or hardware player

More...

--